Good Wednesday afternoon. I have another project to share with you today using Julie’s newly released Rustic Botanicals Die Set and Modern Graphics Paper Pack along with another of her sentiments from the Lovely set. Have you ever started out making a project with an idea of exactly what you want it to be and then have it head south? That is what happened to me today. I started out making a simple three layer dimensional flower using the flower die from the set and Sour Grape cardstock.. I got the flower totally finished and decided I would just add a touch of color to the petals using a mini applicator and some Dusty Concord ink. Yikes!!! Dusty Concord is a very dark purple and I failed to test it out on scratch paper before I started applying it to my flower petals. Big mistake!!! I wasn’t going to toss the flower so I grabbed a Spectrum Noir Amethyst Glamor Glitz and Glamor Pen and applied it to all the petals. Wow! This took me totally out of my comfort zone with this mod sparkly flower. So I had no choice but to use the Olive Jade Falling Leaves Pen on my leaves. I had originally planned on using another piece of the black and white paper from Julie’s paper pack but decided I would color the pattern with purple to add another touch of sparkle to the card. I mean….the sparkle factor on this is way over the top. LOL!
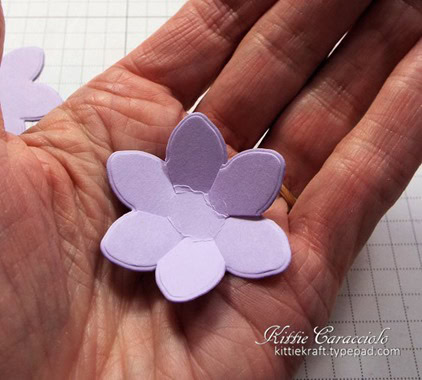
This flower die was created the specific size of the flower image in the coordinating set but I always like to do double duty with my dies. The flower die creates a flower that has more center space and not lots of depth in the cut of the petals. I wanted to create a three layer dimensional flower. I used my scissors to cut in on both sides of each petal to create more room for forming that layer.
I placed the flower face down on the molding pad and used my stylus to roll and form the back of each petal.
I turned the flower face up and pushed down in the center of the flower to pull all the petals up.
I didn’t alter either of the two bottom layers but formed them with my stylus and molding pad. The furthest flower on the left was only formed slightly to create the base of the flower. I added more formation of the second flower layer. I used the small circular die from the set to create the flower center and used my small tipped stylus to scrunch it up.
I used the leaf tool from the garden tool kit to score the leaves and then gently formed them with my fingers.
Here’s a closer view of the flower. It was a little hard to get a good clear picture of the flower with the full card.
I must say this is not my norm but sometimes it’s fun to go out of our comfort zone. I’ll refer to this as a happy mistake gone wild (wild for me that is). LOL!
Thanks for coming by and I hope your week is going well. I’m on third week of puppy/potty training our new now 11 week old puppy. He sure is a bundle of joy and a bundle of hard work. LOL!
Card size: 5.50” x 4.25”


Kitty, I just wanted to tell you that the colors you used are exactly like my favorite African Violet (which is blooming right now). They even have a little sparkle to the blooms. My AV have yellow (stamens?) in the center 🙂 Love all your work, thanks for sharing.
This is really eye-catching, Kittie and it was fun to hear your story. It does sound a little familiar too.
This is beautiful.. love the way the flower turned out…
Such a beautiful card…. I love the soft colors….. Thank you for sharing your amazing talent….
Maybe out of your comfort zone Kittie, but look how smashing it is…you take so much time with your flowers and that is why they are so life like….lovely….also liked your fall card….,
Now we have graduated to a puppy….thought you were just a cat person..glad the training is going well…what is the baby’s name…guess you may have to email these answers….not thinking I would never find them here…lol
The colour turned out beautiful for not being the one you intended. Its fascinating to see the step by step on how you crafted the shape of the blossom. The pretty purple background makes a gorgeous backing.
Thank you for sharing your lovely work and the technique to create it! 🙂
Your card is so beautiful even though it’s not as you planned! Love the sparkly purple flower. You should def go outside your comfort zone more! Love it!!
Good luck on the puppy training! Ours is almost 11 months old and I remember early on wondering what were we thinking! LOL! Totally worth the work as he is so much fun and so sweet!
Une très belle carte et une fleur magnifique ! Gros bisous
Kitty, your SO funny. I learned my first card making skills from you..
I have made flowers for yrs Like you do..I love the flower, but I am not ‘modern’ either..So
happy you got a puppy and hopefully soon “your bundle of joy” will be potty trained and then
it will be toddler time, with the chewing, etc…but they sure are wonderful, and like kids,
these babies never leave home! lol Thanks for the tutorial Kitty..Blessings, V