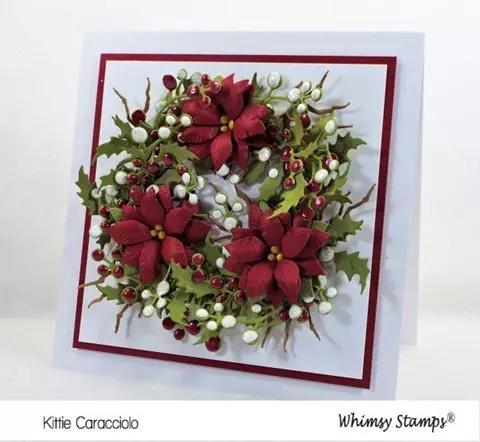
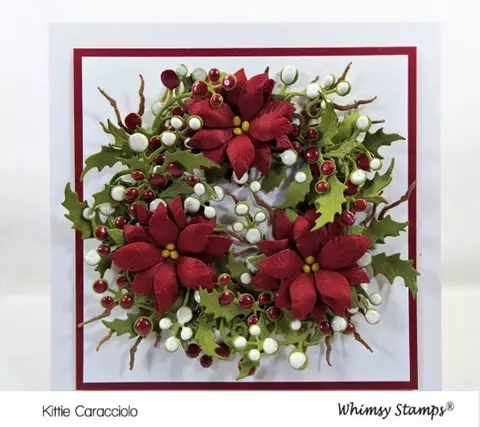
Good Friday morning. I love poinsettias! My mother’s flower shop was always packed with them during the holidays. I learned my love of floral design from mother and love being able to use my skill to create floral projects on my cards. I made this card for the Whimsy Stamps 12 Days of Christmas event using the Christmas Branch Die Set and Build a Poinsettia Die Set. I can’t tell you how much fun I had creating this wreath with the poinsettias and all the beautiful pieces of foliage and berries stems from the branch set.
I started by cutting several of all the different foliage and berry sections using green cardstock. I cut the twig sections using Kraft cardstock and I colored them with Antique Linen ink using a mini applicator. I applied white and red Nuvo Crystal Drops to the holly and mistletoe berry pieces and set them aside to dry. I applied several tiny drops of yellow Nuvo Crystal Drops to a piece of non-stick craft sheet to use for the poinsettia centers and set aside to dry. I cut a 2.50” circle ring using Nestabilities Classic Circles to form the wreath base. I cut red and green sections of the poinsettias. Each poinsettia has three red and one green section. I formed the flowers using my stylus and molding pad to add dimension. Check out my Poinsettia Tutorial if you would like to see more details of how I create my flowers.
The white card base is 5.50” square. The red layer is 4.75” square, the white is 4.50” square and they were attached together using ATG adhesive and then attached to the card base using mounting tape. The wreath ring base was attached to the center of the base using glossy accents. I started building the wreath base by applying full sections of the holly all the way around the ring and attaching with glossy accents. Once the holly base was in place I attached the three poinsettias using glossy accents. I filled in around the poinsettias using smaller pieces of holly and mistletoe attaching them in place with glossy accents. Once I was satisfied with the fullness of the foliage around the flowers I began tucking the twigs, holly and mistletoe berry sections in between and attached with glossy accents. I finished by attaching the yellow drops in the flower centers using glossy accents.
I may have gone a little overboard with the twigs, holly and mistletoe berries but I love the rustic old-fashioned feel of the wreath design.
Thanks for coming by today and I hope you have a wonderful weekend.
Card size: 5.50” square


WOW! WOW! WOW!!!! This is GORGEOUS, Kittie!!!!!!!!! 😉
Good Morning, Kittie, WOW! is what I said as well. such a gorgeous card. Like you I love the poinsettia, it is such wonderful display for the holidays. i could frame this card. One time we just moved an I purchased several poinsettia and displayed them in stair step to represent our tree that year. if you look at the meaning of the flower it is perfect for Christmas or Hanaka……..hugs
Gorgeous! I too love poinsettias.
Oh, my goodness. This is gorgeous beyond words. I love poinsettias and made a number of 3-D cards with handmade poinsettias on them this year. I love, love, love this card. A true work of art.
what can I say to the Queen of Flowers…. absolutely stunning. Thank you for sharing your creativity
This is gorgeous Kittie! Your wreaths are so inspiring. TFS!
Hello Kittie! Wowwww-zers! Beautiful! And I don’t think you went overboard on the branches and twigs, holly or berries, it looks just like something you dream of hanging on your front door for the holidays! You are just so inspiring to me, I need a couple years of practice to even begin to attain your level!
Blessings,
Debbie
Oh wow it is just outstanding, I love how full it is and love the white berries in there!
Magnifique ! Une très belle carte qui donnera beaucoup de plaisir. Gros bisous et bon dimanche !
Beautiful card, & not too busy with the berries & extra foliage. Love it!