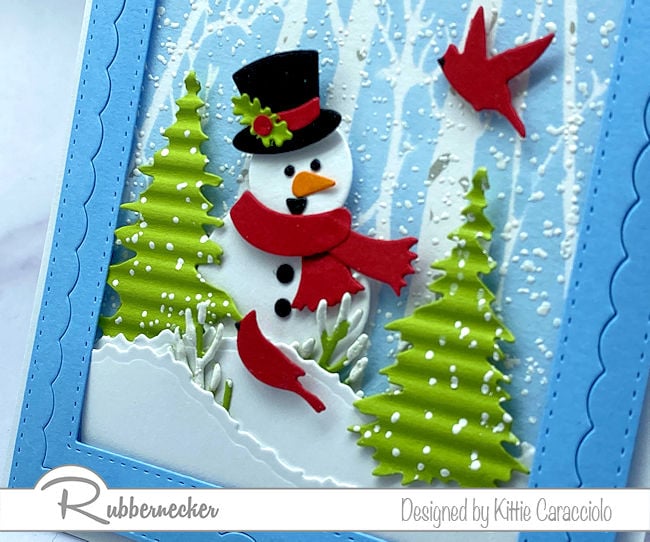
This birch tree stencil gave me the perfect background for my snowy card!
I know it’s the middle of the summer and to cool off I created a frosty little scene on a winter card using the new, two layer birch tree stencil from Rubbernecker to make my snowy background. It’s just perfect for this kind of card and I can’t wait to show you how easy it is to use! And make sure you read through to see how I got that even layer of snow sifting down from the sky – it’s one of my favorite PRO TIPS and it’s ridiculously easy!

The Birch Tree Two Part Stencil
I think this two part stencil makes a gorgeous background for winter scenes but would look wonderful for any season. This is a slimline stencil set but I used the top portion of it for my A2 sized card. I know most of us know how to use stencils but I thought I would do a short video showing how I gently applied the inks for both layers. A picture (or video) is worth a thousand words. Once I was finished with both stencils I heat set the ink with my heat gun to prepare it for the next step.
The Falling Snow
- Apply embossing magic powder to the stenciled background.
- Use white pigment ink to stamp the Splatter Background stamp.
- Apply white pigment ink to the stamp a second time, turn the stamp upside down and stamp the stenciled background a second time. Pro Tip: Turning the background stamp upside down for the second stamping allows the pattern to overlap the first but without mimicking the first pattern.
- Apply white embossing powder to the stenciled layer and heat with the heat gun.
The Frame and Snow Layers
- Use the Rectangle Combo #4 die and blue cardstock to cut the frame sections.
- Turn the two largest frame sections face down on your work surface and attach the two sections together using double stick tape.
- Apply strips of mounting tape all the way around the back of the frame. Pro Tip: I could have attached the two frames together using just the mounting tape but I like using double stick tape first to make sure the sections are perfectly lined up.
- Use white cardstock to cut two Deckle Hill snow layers.
- Attach both snow layers to the back of the frame.
- Apply double stick tape to the back of the snow layers and then attach the frame and snow layers to the stenciled background.
- Apply ATG adhesive to the back of the framed stenciled layer and attach it to the white card base.

The Snowman
- Cut the snowman parts out using white, black, orange and red cardstock.
- Assemble the two snowman layers together using glossy accents.
- Apply glossy accents to the red hat band, attach it the top hat and attach to the snowman head with a piece of mounting tape.
- Attach the red scarf sections to the snowman using mounting tape.
- Use glossy accents to attach the carrot nose, eyes, mouth and buttons to the snowman.
- Add a holly leaves and a red berry to the hat using glossy accents.
- Tuck the snowman behind the snow layer and attach using mounting tape.
The Trees, Sprigs and Cardinals
- Use green cardstock to cut the evergreen trees and evergreen twigs.
- Use a paint brush to apply white gesso to the tips of the evergreen sprigs and set aside to dry.
- Stamp the Splatter Background on the trees using white pigment ink and emboss with white embossing powder.
- Run the trees through a straight crimper to add dimension.
- Smooth the crimped pattern out a little to give some height back to the trees.
- Attach the trees to the scene using pieces of mounting tape.
- Tuck the evergreen sprigs in between the snow layers and attach using glossy accents.
- Use red cardstock to cut the cardinal and use a black marker to color their beaks.
- Attach small pieces of mounting tape to the back of the cardinals and attach them to the scene.

You can my recent Use Stencils and Die Cuts for Wow Cards post showing another fun stenciled card.
I made this snowman card to publish a Christmas in July post but my husband has been ill and in and out of the hospital twice in July. It’s been a busy month and I just haven’t had the time to post as often as I usually do. I hope seeing it now gives you some cool thoughts during this hot summer heat. Our temps here in Florida have been in the low 90s every day.
|


|


This birch tree stencil was so easy to use that I am definitely going to be featuring it more. I love that I can create something that adds a ton of dimension in the background with just a few swipes of ink and that it can be tweaked for any theme and any season. Stencils for the win!
Oh, Kittie, this is a fabulous timesaver! Birch trees are a year round subject in my book, especially for simple and masculine cards. These are a very handsome design, as well as fast, done in the way you have demonstrated. Thank you for the video at this busy time. Blessings.
Kittie, I love the colors you chose for this card – they are so striking and the crimping of the trees is GREAT – adds so much to the card. Everything about this card is just so creative and fun! I just love your creations and you did a great job with this one. Hope your hubby feels better soon. God bless you!
Love this gorgeous backdrop for your snowman! Beautiful!
Thanks Kittie – so many wonderful tips from the “pro”! Love the card!
Beautiful card Kittie…Brrrr…we are heading to Highlands NC tomorrow…mountains…so hoping to have a little of that chill but no snow..
Hope you are doing well…
Hugs
Good to see you posting again, I was a little worried with you living in Florida and their cases of covid being high that you may have caught it.
I love this scene, of course i love snowmen and I like your corrugated trees as well, that does make a great background for any season that’s for sure!